When it comes to security standards, most companies want the best solutions available. For AWS EC2 instances, many customers prefer to keep them private and not expose them to public networks. Making an instance public increases the risk of different types of exploits and attacks by broadening the server’s attack surface. Over the years, various methods have been developed to protect instances while maintaining their functionality.
Traditional methods for reaching EC2 instances
To minimize exposure to the internet, companies have adopted several solutions, each with its own pros and cons. Although many of these technologies are still in use today, we will explore two newer methods that are considered the most secure for connecting to your EC2 instance. How secure are they? You don’t even need an internet gateway in your network layer to connect to the instances! Before we dive into the newer solutions, let’s review the traditional methods and their limitations:
- Bastion host: This method involves using a second instance in the public subnet as a jump host to reach an instance in a private subnet. You connect to the bastion first, then from there to the secure instance. While the EC2 security group only allows traffic from the bastion, this approach requires provisioning, configuring, and paying for an additional instance. Also, it resolves by securing two instances and not only one and raises new problems like a single point of failure, and interruptions of users in each other’s work.
- Load balancer: Load balancers are a great way to distribute traffic across instances, but they can also improve security by placing instances in a private subnet, only allowing traffic from the load balancer using security groups configurations. Load balancers support many security features like TLS/SSL offloading, blocking requests based on IP or Geolocation, implementing WAF (Web Application Firewall), or even authentication and authorization. However, some problems remain, such as the load balancer remaining in the public subnet and having to be secured. Additionally, load balancers incur costs based on compute usage, connections, and data transferred.
- VPN: A VPN creates a private, secure connection over a public network, encrypting data between the user and the server. While it simplifies remote access without needing bastions or load balancers, it still requires configuring a VPN server and acts as a single point of failure to our environment: The VPN server is exposed for DDoS attacks and if someone hacked into one instance he may have access to the entire network.
- Instance connect: Of all the traditional methods, this is absolutely the best one. One of its great benefits is that you can choose to access your instance through a new tab in your browser opened from the AWS EC2 console. Behind the scenes, AWS temporarily pushes an SSH key to the instance so a session starts with full connectivity from your browser. Although it solves many issues, you still need to consider that it requires a public IP and open port 22 for SSH access.
Newer, more secure solutions: SSM session manager and instance connect endpoint
The latest AWS services, SSM Session Manager and Instance Connect Endpoint, offer more secure and streamlined connection options:
- No internet gateway is needed.
- No public IP is required.
- Access control using IAM.
- Easy configuration.
Pretty amazing, right? Let’s dive into these solutions and learn how to implement them in our environment.
How to use the Instance Connect Endpoint?
Instance Connect Endpoint is the simpler option of the two. Similar to Instance Connect, but with different requirements. Before entering the EC2 console, go to the VPC console, and under the ‘Endpoints’ tab, create a new endpoint of type ‘EC2 Instance Connect Endpoint’. Configure its properties, such as security groups (for restricting access to the endpoint) and subnets, and you’re set. Back in the EC2 console, under the ‘EC2 Instance Connect’ tab, you’ll find two options: The older Instance Connect method or the new endpoint option. Select the endpoint you created, and a new tab with a session to the instance will open. 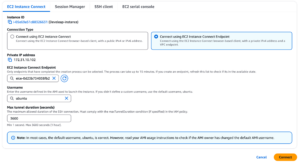
What is an SSM session manager?
AWS Systems Manager (SSM) offers various ways to manage EC2 instances, from running scripts to patching operating systems. The SSM Session Manager simplifies secure connections to instances without requiring public components. You can start sessions from the SSM console, EC2 console, or even use port-forwarding via the CLI with VSCode extensions. To use SSM session manager, you first need to complete some prerequisites:
- Create three VPC interface endpoints in your VPC: ssmmessages, ec2messages, and SSM. These steps are made to establish a connection between your server and the SSM service.
- Ensure the SSM agent is installed on your instance (most AWS AMIs have this by default, but if issues arise, it is better to make sure that the agent exists). If you don’t have it installed, you can install it using the instructions provided here.
- Attach an IAM role with the AmazonSSMManagedInstanceCore AWS managed policy to your instance so it will have the required permissions.
- Allow communication on port 443 between the instance and SSM. Remember that there are two security groups to configure, one for the instance and one for the interface endpoint.
- If you want to establish a session from outside of the AWS console, then you should have two more CLI tools for connecting to the instance. The first is the AWS CLI and the second is the SSM agent plugin for CLI.
Creating a session
Now for the main part! Once your environment is ready, creating a session is straightforward. You can initiate a session in your browser from the SSM or EC2 console under the Session Manager tab in the connection options. If you prefer to connect from your local terminal instead, then after installing the required plugins then you should be able to use the ‘start-session’ command with no problems. Here is an example of how to use this command:
aws ssm start-session --target YOUR_INSTANCE_ID --region REGION --profile PROFILE
You can also add the following parameters to start port-forwarding session:
--document-name AWS-StartPortForwardingSession --parameters '{"portNumber":["INSTANCE_PORT"], "localPortNumber":["YOUR_PORT"]}'
In the document-name flag we are specifying the AWS document that will be used to start the instance, you can find it in the SSM console under ‘documents.’ If you run into a scenario where you run this command, and nothing happens, then it’s probably a problem with your SSM agent plugin in your CLI. When you are verifying the plugin installation, you may get the following error: “zsh: bad CPU type in executable: session-manager-plugin” In this case you simply need to run the command.
‘softwareupdate --install-rosetta’
command.
Conclusion
These are some amazing ways to connect securely to your instances in isolated subnets, don’t you think? As for today, both methods represented here are the most secure ways AWS provides to connect to your instances, and now we understand why and how to do it. Sometimes, we need to go back to the other methods, such as using a VPN, but I hope that now you see the potential of these services. If you follow along with this article, you understand by now how simple it is to implement these methods in our environment. I recommend checking it out for yourself to get the beneficial value firsthand.