Our previous article explained what a bastion is and why AWS Session Manager is the preferable way to establish connections.
In this guide, we will explore how to set up a private bastion with an SSM connection, launch the DB tunnel on it, and use IAM roles for accessing the tunnel.
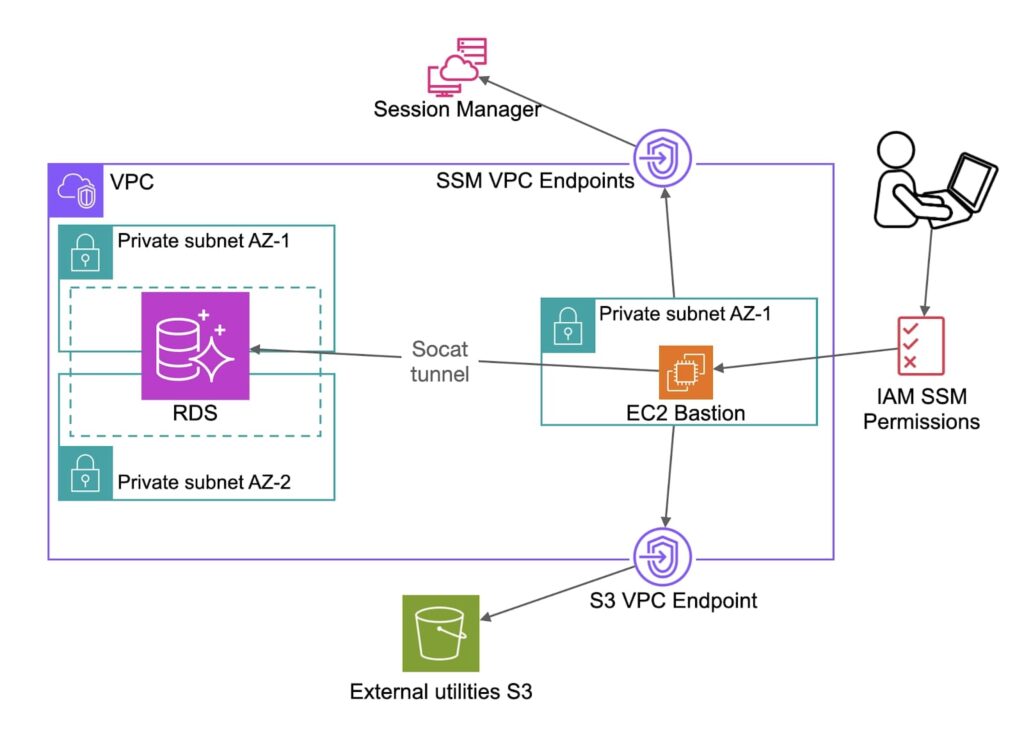
We are going to create an RDS instance in an air-gapped VPC (with no ingress or egress internet connection), and will establish a connection to this database with a private SSM bastion with an RDS tunnel on it and restrict access to use this tunnel only.
Prerequisites:
- AWS CLI installed and configured with admin AWS permissions
- Terraform installed
Step 0: VPC and RDS
Our basic infra is a VPC with 2 private subnets in 2 AZs, and an RDS instance in these subnets:
terraform {
 required_providers {
   aws = {
     source  = "hashicorp/aws"
     version = "~> 4"
   }
 }
}

provider "aws" {
 region = "us-east-2"
}

### VPC ###
resource "aws_vpc" "vpc" {
 cidr_block           = "10.55.0.0/16"
}

# Two private subnets in two availability zones
resource "aws_subnet" "private_subnet" {
 vpc_id               = aws_vpc.vpc.id
 count                = 2
 cidr_block           = "10.55.${count.index}.0/24"
 availability_zone_id = "use2-az${count.index + 1}"
}

## Aurora Postgres RDS ###
resource "aws_db_subnet_group" "subnet_group" {
 name       = "private"
 subnet_ids = [aws_subnet.private_subnet[0].id, aws_subnet.private_subnet[1].id]
}

# our database accepts all connection on default postgres port 5432 from the VPC
resource "aws_security_group" "postgres" {
 name   = "rds-private"
 vpc_id = aws_vpc.vpc.id
 ingress {
   from_port       = 5432
   to_port         = 5432
   protocol        = "tcp"
   cidr_blocks     = [aws_vpc.vpc.cidr_block]
 }
 egress {
   from_port   = 0
   to_port     = 0
   protocol    = "-1"
   cidr_blocks = ["0.0.0.0/0"]
 }
}

resource "aws_rds_cluster" "postgres" {
 cluster_identifier     = "aurora-postgres-demo"
 engine                 = "aurora-postgresql"
 database_name          = "postgres"
 master_username        = "postgres"
 master_password        = "postgres"
 db_subnet_group_name   = aws_db_subnet_group.subnet_group.name
 vpc_security_group_ids = [aws_security_group.postgres.id]

 # When we delete the DB, it creates the final snapshot by default.
 # We don’t need it for the demo
 skip_final_snapshot    = true
}

resource "aws_rds_cluster_instance" "postgres" {
 identifier         = "postgres"
 cluster_identifier = aws_rds_cluster.postgres.id
 # minimal instance type that works with Aurora Postgres
 instance_class     = "db.t4g.medium"
 engine             = aws_rds_cluster.postgres.engine
}
After we apply this part, we have a database, but cannot connect to it yet.
Step 1: Bastion instance
Although SSM has a Quick Setup feature, it is not recommended by AWS for first-time setup. In this guide, we will establish a Session Manager connection step-by-step.
To establish an SSM connection on the EC2 instance, the following is required:
- SSM agent installed on EC2
- IAM permissions
- Network connections to Session Manager
- To connect from a local machine, we need to install the SSM plugin for AWS CLI
SSM agent on EC2
We can install the agent by ourselves. However, we can use one of Amazon Linux AMIs instead, where the agent is preinstalled. It also has AWS CLI pre-installed, which we will need further in this guide. For instance, let’s take the latest Amazon Linux 2023 AMI:
data "aws_ami" "example" {
 most_recent      = true
 owners           = ["amazon"]
 filter {
   name   = "name"
   values = ["al2023-ami-2023*-x86_64"] # but not al2023* - the output can be a ‘minimal’ type, that doesn’t have an SSM agent
 }
}
IAM Permissions
The EC2 bastion should have a predefined list of IAM permissions in order to be able to connect to AWS SSM. The recommended (and minimally-sufficient) is managed SSM Instance Core policy. Let’s create an instance profile with this policy:
resource "aws_iam_role" "bastion" {
 name               = "bastion"
 assume_role_policy = <<POLICY
{
   "Version": "2012-10-17",
   "Statement": [
       {
         "Effect": "Allow",
         "Principal": {
             "Service": ["ec2.amazonaws.com"]
         },
         "Action": "sts:AssumeRole"
       }
   ]
}
POLICY
}

resource "aws_iam_role_policy_attachment" "bastion-ssm" {
 policy_arn = "arn:aws:iam::aws:policy/AmazonSSMManagedInstanceCore"
 role       = aws_iam_role.bastion.name
}

resource "aws_iam_instance_profile" "bastion" {
 name = aws_iam_role.bastion.name
 role = aws_iam_role.bastion.name
}
Network connections to Session Manager
The Systems Manager agent on EC2 can connect to the AWS Session Manager service over the Internet, but since we are building an air-gapped environment, it is not possible (and not secure). To establish this connection, we will propagate VPC Endpoints.
VPC endpoints are virtual network interfaces that keep the traffic inside the AWS Network (bypassing the Internet)
There are three mandatory Interface Endpoints: SSM, ssmmessages, and ec2messages.
It’s better to avoid opening any connections from the subnets where our database is deployed, therefore, we will use a separate subnet for our Bastion, and will open VPC Endpoints on this subnet only.
- Private DNS names should be enabled on VPC Endpoints since SSM Agent looks for them to connect. Thus, we need to enable DNS hostnames in our VPC.
- VPC Endpoints should accept HTTPS traffic from the subnet where the EC2 instance is located. By default, Interface endpoints use the default security group, which is not recommended, therefore, we will create a dedicated security group for this.
# edit our VPC and add DNS hostnames
resource "aws_vpc" "vpc" {
 cidr_block           = "10.55.0.0/16"
 enable_dns_hostnames = true
}

# separate subnet for Bastion
resource "aws_subnet" "private_bastion_subnet" {
 vpc_id               = aws_vpc.vpc.id
 cidr_block           = "10.55.2.0/24"
 availability_zone_id = "use2-az1"
}

# security group for VPC endpoints
resource "aws_security_group" "ssm_endpoints" {
 name   = "ssm_endpoints"
 vpc_id = aws_vpc.vpc.id
 ingress {
   from_port   = 443
   to_port     = 443
   protocol    = "TCP"
   cidr_blocks = [aws_subnet.private_bastion_subnet.cidr_block]
 }
 egress {
   from_port   = 0
   to_port     = 0
   protocol    = "-1"
   cidr_blocks = ["0.0.0.0/0"]
 }
}

# SSM Endpoint
resource "aws_vpc_endpoint" "ssm" {
 vpc_endpoint_type   = "Interface"
 vpc_id              = aws_vpc.vpc.id
 service_name        = "com.amazonaws.us-east-2.ssm"
 private_dns_enabled = true
 subnet_ids          = [aws_subnet.private_bastion_subnet.id]
 security_group_ids  = [aws_security_group.ssm_endpoints.id]
}

# SSM Messages Endpoint
resource "aws_vpc_endpoint" "ssmmessages" {
 vpc_endpoint_type   = "Interface"
 vpc_id              = aws_vpc.vpc.id
 service_name        = "com.amazonaws.us-east-2.ssmmessages"
 private_dns_enabled = true
 subnet_ids          = [aws_subnet.private_bastion_subnet.id]
 security_group_ids  = [aws_security_group.ssm_endpoints.id]
}

# EC2 Messages Endpoint
resource "aws_vpc_endpoint" "ec2messages" {
 vpc_endpoint_type   = "Interface"
 vpc_id              = aws_vpc.vpc.id
 service_name        = "com.amazonaws.us-east-2.ec2messages"
 private_dns_enabled = true
 subnet_ids          = [aws_subnet.private_bastion_subnet.id]
 security_group_ids  = [aws_security_group.ssm_endpoints.id]
}
EC2 Bastion Instance
Finally, we can create the instance and its security group – as promised, no inbound traffic is allowed:
### EC2 Bastion ###
resource "aws_security_group" "bastion" {
 name   = "bastion"
 vpc_id = aws_vpc.vpc.id
 egress {
   from_port   = 0
   to_port     = 0
   protocol    = "-1"
   cidr_blocks = ["0.0.0.0/0"]
 }
}

resource "aws_instance" "bastion" {
 subnet_id              = aws_subnet.private_bastion_subnet.id
 ami                    = data.aws_ami.al2023.id
 instance_type          = "t2.micro"
 iam_instance_profile   = aws_iam_instance_profile.bastion.name
 vpc_security_group_ids = [aws_security_group.bastion.id]
}

output instance_id {
 value = aws_instance.bastion.id
}
After applying all this, we should be able to connect to EC2 with SSM
Testing the connection
- from AWS Console:
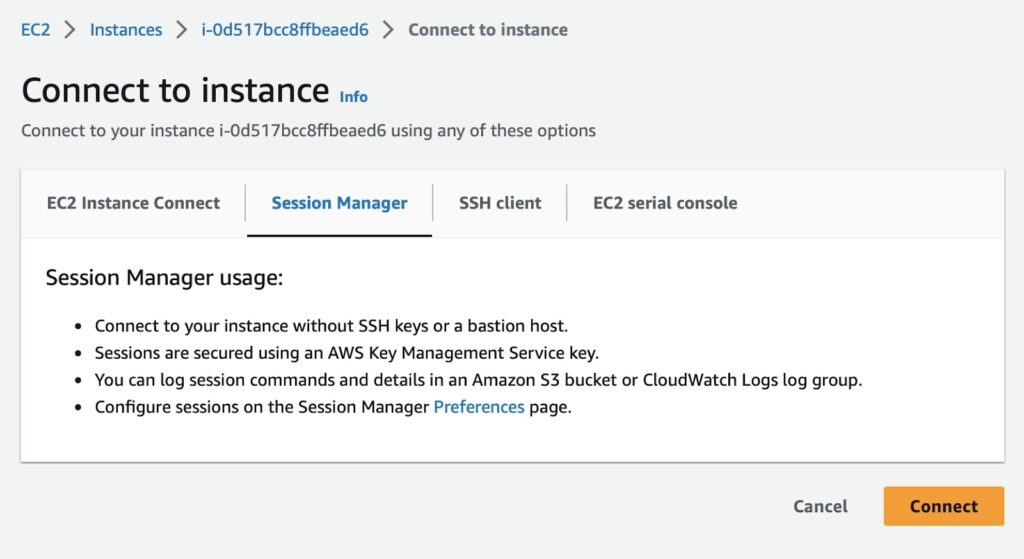
- from remote machine:
First, let’s install the SSM plugin for AWS CLI. Simply follow the AWS instructions https://docs.aws.amazon.com/systems-manager/latest/userguide/session-manager-working-with-install-plugin.html
Then use the command aws ssm start-session –target <instance-id>

Step 2: Setting up an RDS tunnel
About socat utility
We have an EC2 instance and an RDS cluster in the same VPC, but they are not connected yet. We want our new bastion to serve us as a connection tunnel for RDS. For this purpose, we can use the powerful socat utility, which allows bidirectional data transfers from one location to another. It can connect between different data sources like files, pipes and devices.
We will launch it as a TCP port forwarder from any port we choose as the RDS port.
The syntax to launch the tunnel is:
sudo socat TCP-LISTEN:<source_port>,reuseaddr,fork TCP4:<rds_endpoint>:<rds_port> &We can use the default 5432 postgres port for the source and destinations, all incoming connections on our bastion for port 5432 will be forwarded to the DB and back.
Installing external utilities in an air-gapped environment
The challenge in an air-gapped environment is how to install socat. Usually we just run “yum install socat”, but this will not work without the Internet.
- We can build our own AMI containing the utility, but then we need to maintain, patch and update it all the time
- Alternatively, we can make our subnet public for the moment of installation, but we prefer keeping our environment closed; and it’s hard to manage this in a single Terraform run
- In this solution, we upload the utility to an S3 bucket, create an S3 VPC endpoint for the bastion’s subnet and give the bastion’s IAM instance profile permissions to pull the file.
# Route table for S3 Gateway endpoint
resource "aws_route_table" "bastion" {
 vpc_id = aws_vpc.vpc.id
}
# Bind route table to bastion's subnet
resource "aws_route_table_association" "bastion" {
 subnet_id      = aws_subnet.private_bastion_subnet.id
 route_table_id = aws_route_table.bastion.id
}
# S3 VPC Endpoint
resource "aws_vpc_endpoint" "s3" {
 vpc_id          = aws_vpc.vpc.id
 service_name    = "com.amazonaws.us-east-2.s3"
 route_table_ids = [aws_route_table.bastion.id]
}
# S3 bucket for socat utility
resource "aws_s3_bucket" "private_bastion_resources" {
 bucket_prefix = "private-bastion-resources"
}
# Basic security requirement for S3 buckets
resource "aws_s3_bucket_public_access_block" "bastion" {
 bucket = aws_s3_bucket.private_bastion_resources.id
 block_public_acls   = true
 block_public_policy = true
 ignore_public_acls = true
 restrict_public_buckets = true
}
# Download the socat utility
resource "null_resource" "socat" {
 provisioner "local-exec" {
   command = "curl -o socat.rpm https://kojipkgs.fedoraproject.org/packages/socat/1.7.4.4/2.fc38/x86_64/socat-1.7.4.4-2.fc38.x86_64.rpm"
 }
}
# And upload it to S3 bucket
resource "aws_s3_object" "socat" {
 depends_on = [null_resource.socat]
 bucket     = aws_s3_bucket.private_bastion_resources.id
 key        = "/bastion_resources/socat.rpm"
 source     = "./socat.rpm"
}
# IAM Policy to allow downloading the files
resource "aws_iam_policy" "bastion_s3" {
 name_prefix = "bastion_s3"
 policy = jsonencode({
   Version = "2012-10-17"
   Statement = [
     {
       Action = [
         "s3:GetObject"
       ]
       Effect   = "Allow"
       Resource = "${aws_s3_bucket.private_bastion_resources.arn}/bastion_resources/*"
     }
   ]
 })
}
resource "aws_iam_role_policy_attachment" "bastion_resources" {
 policy_arn = aws_iam_policy.bastion_s3.arn
 role       = aws_iam_role.bastion.name
}
Launch the tunnel
Now we can download socat from our S3 Bucket and launch the tunnel. We can do it when the instance starts, by putting all the commands to user data. Let’s edit our bastion manifest:
resource "aws_instance" "bastion" {
 depends_on             = [aws_rds_cluster.postgres, aws_s3_object.socat]
 ...
 user_data              = <<EOF
#!/bin/bash
cd ~
aws s3 cp s3://${aws_s3_bucket.private_bastion_resources.id}/bastion_resources/socat.rpm .
sudo yum install -y ./socat.rpm
sudo socat TCP-LISTEN:5432,reuseaddr,fork TCP4:${aws_rds_cluster.postgres.endpoint}:5432 &
EOF
}
Testing the connection
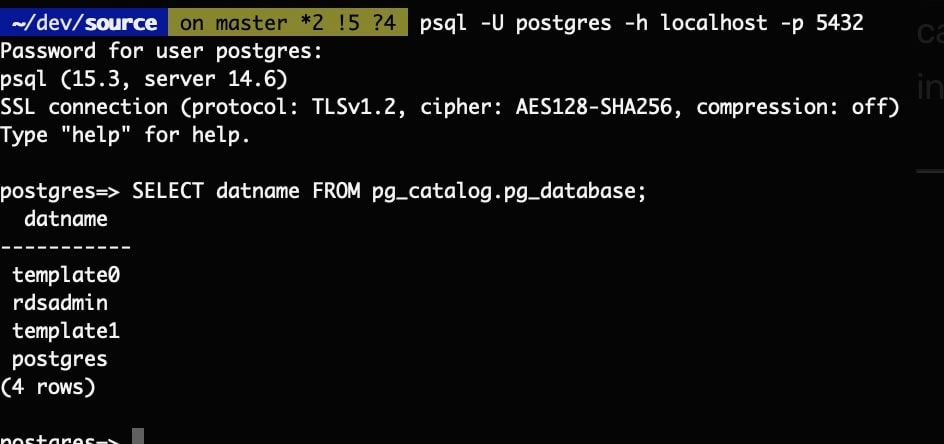
Let’s launch the port-forwarding session command:
aws ssm start-session --target i-0d517bcc8ffbeaed6

 --document-name AWS-StartPortForwardingSession --parameters '{"portNumber":["5432"], “localPortNumber":["5432"]}'
Now we can connect to the database using localhost:5432

Step 3: Limiting permissions
As we saw in the previous command, SSM uses a resource called “document”. It defines the actions that the Systems Manager is allowed to perform on a connected EC2 instance. There are more than 100 pre-configured documents.
We can give permissions only for certain document types (connection types), like launching the interactive commands, starting ssh or a port-forwarding session.
Let’s create an IAM policy for tunneling the bastion:
resource "aws_iam_policy" "private_rds_ssm_access" {
 name_prefix = "private_rds_ssm_access"
 policy = jsonencode({
   Version = "2012-10-17"
   Statement = [
     {
       Action = [
         "ssm:DescribeDocument",
         "ssm:GetDocument"
       ]
       Effect   = "Allow"
       Resource = "arn:aws:ssm:*::document/AWS-StartPortForwardingSession"
     },
     {
       Action = [
         "ssm:StartSession"
       ]
       Effect   = "Allow"
       Resource = "${aws_instance.bastion.arn}"
     },

     {
       Action = [
         "ssm:ResumeSession",
         "ssm:TerminateSession"
       ]
       Effect   = "Allow"
       Resource = "arn:aws:ssm:*:*:session/$${aws:username}-*"
     }
   ]
 })
}
When we give this IAM policy to an IAM entity, it is able to connect to this bastion only.
As an additional security improvement, let’s allow incoming connection to the DB from the bastion only:
resource "aws_security_group" "postgres" {
 name   = "rds-private"
 vpc_id = aws_vpc.vpc.id
 ingress {
   description     = "incoming connection from bastion"
   from_port       = 5432
   to_port         = 5432
   protocol        = "tcp"
   security_groups = [aws_security_group.bastion.id]
 }
...
}
We’re all set up!
Cleanup:
terraform destroyAdditional note:
The tunnel inside the bastion might be a bottleneck in comparison to a direct connection to the DB. However, this connection type is intended mainly for DB maintenance, not data processing.
Bonus: Python code for SSM
In addition to the Terraform manifest, I published sample python code that uses SSM plugin to open an SSM session and executes SQL query using this connection
The sources can be found on develeap’s GitHub
https://github.com/develeap/terraform-ssm-bastion-for-rds