
Resource requests and limits in Kubernetes might seem like simple configuration parameters, but they’re actually the foundation of how your cluster makes scheduling decisions and enforces resource isolation.
Misconfigure them, and you’re either wasting money on underutilized nodes or setting yourself up for cascading failures that could bring down multiple applications.
I’ve seen teams struggle with this more than almost any other Kubernetes concept. It’s easy to overlook during initial deployments, but the consequences show up in production: OOMKilled pods, CPU throttling that slows critical services, or cluster nodes that look healthy but are actually overcommitted and one spike away from trouble.
The Basics: Requests vs. Limits
In Kubernetes, every container can specify two types of resource constraints that serve fundamentally different purposes:
- Resource requests specify the minimum amount of CPU and memory a container requires. The scheduler uses these values to find a node with enough capacity. If no node has sufficient resources, your pod stays Pending. Think of requests as your reservation.
- Resource limits define the maximum amount of resources a container can consume. They’re enforced by the container runtime. If a container exceeds its CPU limit, it gets throttled. If it exceeds its memory limit, it gets killed with an OOMKill. Limits are your ceiling.
Here’s a simple example:
resources:
  requests:
    memory: "256Mi"
    cpu: "250m"
  limits:
    memory: "512Mi"
    cpu: "500m"
This reserves 256 MiB of memory and 0.25 CPU cores, while allowing the container to burst up to 512 MiB and 0.5 cores.
Why Settings Requests and Limits Matters More Than You Think
Resource requests and limits aren’t just about preventing outages. They impact three critical areas:
- Scheduling efficiency – Without requests, the scheduler is blind. It might pack too many pods on one node, causing degradation, or spread them too thinly, leaving underutilized (but expensive) nodes.
- Cost optimization – Overprovisioned requests waste money on idle capacity. Underprovisioned requests lead to overcommitment, in which the cluster thinks it has capacity until all pods reach their limits.
- Blast radius containment – Proper limits prevent one application’s memory leak from bringing down an entire node. The container gets killed and restarted, containing the damage.
How to Set Requests and Limits For Your Workloads
There’s no universal formula, but there are principles that work across most workloads.
Setting Requests
Set requests based on your application’s baseline resource consumption under normal, steady-state operation. Not worst-case, not idle, but typical production load.
The best approach:
- Run your application in a test environment with realistic traffic
- Monitor resource usage over time
- Use the 50th or 75th percentile usage, not the peak
Setting Limits
This is where CPU and memory diverge, because they behave fundamentally differently under constraint.
- CPU is compressible – When a container hits its CPU limit, it gets throttled but keeps running. The application might slow down, but it doesn’t crash.
- Memory is incompressible – You can’t throttle memory. When a container reaches its memory limit, the kernel kills it. There’s no middle ground.
This fundamental difference shapes how we approach limits for each resource type.
The Memory Rule: Requests Should Equal Limits
For memory, you almost always want to set requests equal to limits. Here’s why:
When requests and limits differ for memory, you’re lying to the scheduler. You say “I need 256 MiB” but allow the pod to use 512 MiB. The scheduler might pack your node based on the 256 MiB requests, thinking it has capacity for other pods. But when your application actually needs its full 512 MiB, the node runs out of memory, and the kernel starts killing processes.
Unlike CPU — which can be throttled — memory cannot be rate-limited on a node. When a pod exceeds its defined memory limit, the kernel invokes the OOM killer and the container is terminated.
By setting memory requests equal to limits, you get:
- Honest scheduling – The scheduler reserves the full amount you’ll actually use
- Guaranteed allocation – Your pod is protected from scheduler overcommit and is far less likely to be OOMKilled due to noisy neighbors
- Predictable capacity planning – You know exactly how many pods fit on each node
The CPU Exception: Why You Might Skip the Limit
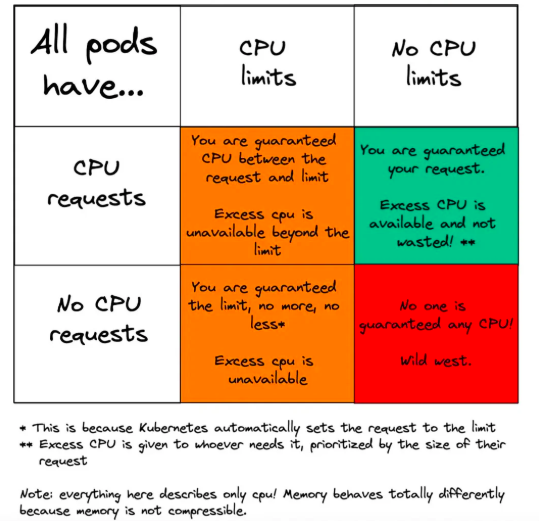
Unlike memory, there’s a strong argument for not setting CPU limits at all, especially for latency-sensitive applications.
The problem: when a container reaches its CPU limit, it gets throttled even if the node has idle CPU. You could have 70% of the CPU idle while your application responds slowly because you enforced an arbitrary ceiling.
For many workloads, it makes sense to set CPU requests but skip the limit. Your application can burst to use available CPU when needed, while the scheduler still has enough information for good placement decisions.
The trade-offs:
- Without limits – Pods can use idle CPU capacity to maximize utilization. Risk: a runaway container could consume all the CPU on a node.
- With high limits – Setting limits at 4x-8x the request provides a safety valve while still allowing bursting.
- With strict limits – Useful for predictable cost control, but sacrifices performance for budget certainty.
When to Break These Rules
Despite the patterns above, there are legitimate scenarios where you’d deviate:
- Batch or background jobs – Set memory limits higher than requests for variable workloads that are idempotent and can safely restart if OOMKilled.
- Best-effort workloads – Omit requests and limits entirely for pods you’re intentionally willing to have evicted first under resource pressure (e.g., cache warmers or speculative jobs).
- Strict cost controls – Setting CPU limits caps how much compute each pod can consume, enabling tighter bin-packing across nodes and reducing the number of nodes needed.
- Compliance requirements – Some regulatory environments require provable resource isolation with strict limits.
The key is intentionality. Break the rules when you have a reason, document it, and monitor the effects.
The Operational Reality
Resource management is an iterative process, not a one-time configuration. Your initial settings will be wrong – sometimes dramatically. What matters is having the observability and process to improve them over time.
Treat resource configurations as living documentation of your application’s behavior:
- When you see OOMKills, investigate whether it’s a leak or an undersized limit
- When you see CPU throttling, reevaluate whether that limit makes sense
- When nodes are underutilized, look for overprovisioned requests to tighten
At minimum, you need visibility into actual resource usage, throttling events, and OOMKills. Tools like kube-state-metrics, Prometheus, and the vertical pod autoscaler can provide data-driven insights rather than guesswork. Pair this with alerts — OOMKills and sustained CPU throttling should never be silent; they’re signals that your configuration has drifted from reality.
The Bottom Line
Resource requests and limits aren’t optional configuration – they’re the contract between your application and the cluster about how resources will be shared. Get that contract right, and Kubernetes becomes remarkably stable and efficient. Get it wrong, and you’ll face unexpected costs or production issues that are hard to debug.
Start with the simple rules:
- Set requests based on observation of typical usage
- Set memory limits equal to requests for predictable allocation
- Skip CPU limits unless you have a specific reason not to
Then iterate, monitor, and refine. The goal isn’t perfection on day one – it’s building the discipline and tooling to continuously improve your resource configurations as you learn more about your applications’ actual behavior in production.