

Why We Needed a Change
During the last FinOps cycle, we discovered that the majority (over 80%) of AWS Lambda costs in one of our environments were due to our team’s product. This led me to suggest to the team leader that we add performance and cost benchmarks, as well as improvements, to our yearly plan. I then realized that we never incorporate this process into our development cycle unless we are directly impacted by its outcomes.
The next day I started researching for a solution to provide a better, shorted, feedback loop from our lambda’s performances, and a way to incorporate it in a friendly and easy fashion so our developers can effortlessly use it and learn from it.
Enter: AWS Lambda Power Tuning
While researching, I came across a fantastic article titled Rightsizing Your Lambdas: Lambda Power Tuning & Compute Optimizer. It introduced a powerful open-source tool, named aws-lambda-power-tuning.
This tool allows you to deploy a serverless stack using frameworks like Terraform, AWS CDK, or AWS SAM. At its core is a Step Function that orchestrates a series of Lambda invocations across various memory configurations, helping you identify the most cost-effective or high-performing setup.
How It Works
The tool requires a JSON configuration file that defines:
lambdaARN: The target Lambda functionpowerValues: Memory sizes to test (e.g., 128MB to 8192MB)payload: Sample inputs with weightsstrategy: Optimization goal (cost,speed, orbalanced)autoOptimize: Whether to apply the best config automaticallyonlyColdStarts: Option to test cold starts only
Here’s a snippet of a sample config:
{
    "lambdaARN": "arn:aws:lambda:us-east-1:012345678901:function:FibonacciBenchmark",
    "num": 50,
    "powerValues": [128, 256, 512, 1024, 2048, 3008, 4096, 5120, 6144, 7168, 8192],
    "payload": [
        { "payload": { "number": 10 }, "weight": 30 },
        { "payload": { "number": 20 }, "weight": 15 },
        { "payload": { "number": 30 }, "weight": 5 }
    ],
    "payloadS3": "",
    "parallelInvocation": true,
    "strategy": "cost",
    "balancedWeight": 1.0,
    "autoOptimize": true,
    "autoOptimizeAlias": "poc",
    "dryRun": false,
    "preProcessorARN": "",
    "postProcessorARN": "",
    "discardTopBottom": 0.2,
    "sleepBetweenRunsMs": 0,
    "disablePayloadLogs": false,
    "includeOutputResults": true,
    "onlyColdStarts": false,
    "allowedExceptions": []
}
You then trigger the Step Function using a simple Bash script. It retrieves the state machine ARN, starts the execution, and polls for completion.
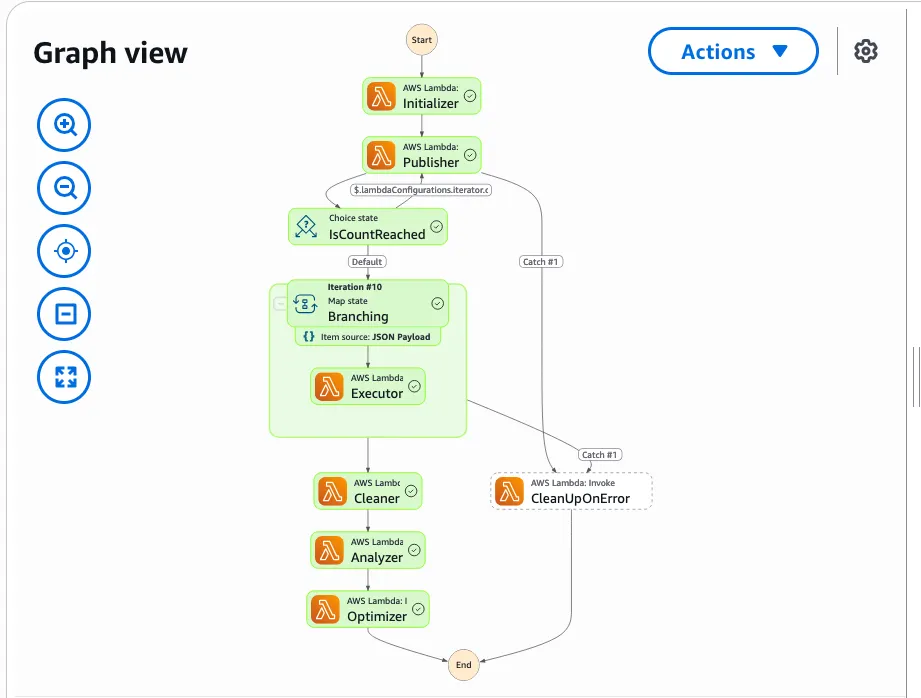
Once done, it returns a detailed report including:
- Execution duration
- Cost per memory size
- A visualization link to compare results
Visualizing the Results
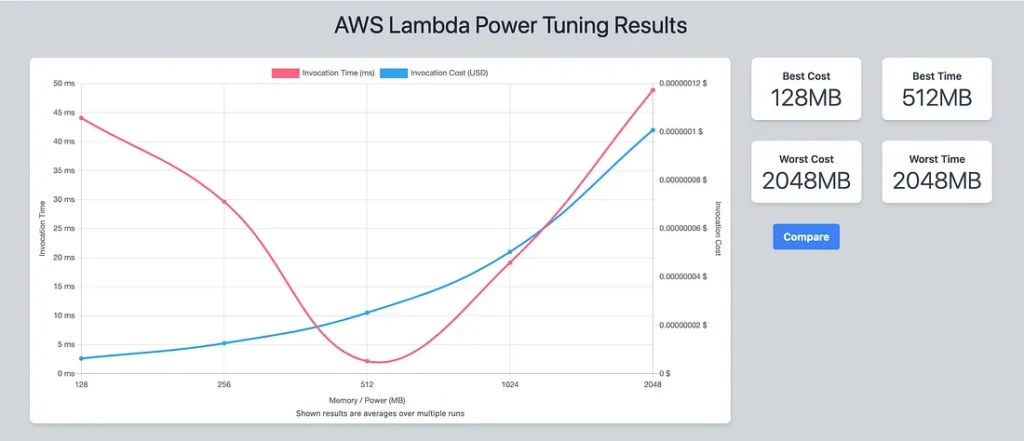
The output includes a link to a beautiful, interactive chart that makes it easy to compare performance and cost across memory configurations. For example:
{
  "power": 256,
  "cost": 1.26E-8,
  "duration": 2.494333333333334,
  "stateMachine": {
    "executionCost": 0.00098,
    "lambdaCost": 0.0006204261000000001,
    "visualization": "https://lambda-power-tuning.show/#gAAAAQACAAQACMALABAAFAAYABwAIA==;iM+vQSijH0AX2SpBNhcSQIGVMUEQWBlAKOoJQZNfJECcxCpBUUYrQQPkVEE=;l0+QMmN3WDJjd9gyY3dYM2N32DOt9x40Y3dYNJ5KhzSKWaI0dmi9NJdPEDU="
  },
  "stats": [
    {
      "value": 128,
      "averagePrice": 1.68E-8,
      "averageDuration": 21.976333333333333
    },
    # Omitted ....
}
This makes it incredibly easy to identify the sweet spot for your function — whether you’re optimizing for cost, speed, or a balance of both.

beautiful, isn’t it?
Deploying with AWS SAM
To get started quickly, you can deploy the solution with AWS SAM:
- Clone the repo:
git clone https://github.com/zmynxx/aws-lambda-power-tuning.git
2. Build locally: sam build -u
3. Deploy: sam deploy -g
Provide your stack name and region when prompted.
Automation
The tool supports full automation. Once configured, the Step Function can automatically create a new Lambda version with the optimal memory setting and assign it an alias (e.g., dev).
"strategy": "cost",
"balancedWeight": 1.0,
"autoOptimize": true,
"autoOptimizeAlias": "dev",
Semi-Automated
While we love automation, we stick to Infrastructure as Code (IaC). That means we don’t change live infrastructure directly — we update the manifest used to deploy it.
To simplify this, I created an action.yaml to invoke the script. It wraps the entire process, including visualization. The only required step is configuring AWS credentials and defining the correct runner.
Once the workflow is in place, developers can:
- Commit a
config.jsonfile - Trigger the workflow
- Receive a visualization link with results
Links:

Trigger lambda analysis

Successful run
Where the Visualization Link would take us to:
What’s Next?
Awareness is just the beginning. We expect every developer to:
- Run the tuning workflow for new and existing Lambda functions.
- Narrow down
powerValuesto find the best configuration for each environment:
– Dev → Cost-effective
– Prod → High performance - Include the resulting visualization in their pull request as proof of optimization.
This process ensures that performance and cost are no longer afterthoughts — they’re part of our development DNA.