
The Art of RPM: Crafting Packages in Linux
Have you ever wondered how a simple command in Linux can unleash such powerful actions? Take, for instance, the command, yum install nginx.
At first glance, it’s just a line of text. But when you delve deeper, it’s a key to a much larger world – it effortlessly installs the Nginx web server, one of the backbones of modern internet infrastructure. This isn’t just a command; it’s a glimpse into the heart of Linux’s power: package management.
Why am I talking about this, you might ask. Well, It’s because there’s a kind of hidden artistry behind it. A powerful system that makes it possible to accomplish such a complex task by something as easy as typing a sentence. And the best part? You can learn it too.
In this article, I’m going to guide you through the steps of creating your own Linux package, something you can install with a package manager like yum or apt.
Packages play a significant role in the Linux operating system. They are essential for bundling software applications into a format that Linux understands and manages efficiently. Most Linux commands, including familiar ones like ls, grep, systemctl, and many more, originate from installed packages.
But why should you care about creating packages? If you’re developing software for Linux or a part of a team that does, knowing how to package your applications is invaluable. It simplifies distribution and makes it much easier for users to install and update your software – just like they would with the nginx package.
So, get ready, here we go:
What is RPM package and what does it contain?
RPM file is a software package format for distributing and installing applications on Red Hat-based distributions.
A file with .rpm extension contains:
– RPM Header that contains all the metadata about the package. The metadata is used to determine dependencies, file installation location, version and other important information.
– CPIO archive that contains all the necessary files for installation.

The image above shows the RPM header details.
In the example above, yum info nginx command is used to get certain metadata about a package. This metadata comes from the rpm header that is part of the nginx package.
How To Create an RPM package?
Prerequisites
To follow along, there are a few requirements:
- A Red Hat Based system, It can be RHEL, Centos, Fedora, or you can even use docker if you want to be a hero.
- The rpmdevtools package, it can be installed with the following command:
sudo yum install -y rpmdevtools rpmlint* rpm lint is not a requirement, but it is highly recommended, you will see later why 🙂
- All the files provided in this article can be git cloned by:
git clone https://github.com/EliorEstrin/RPM_Packaging_Tutorial.gitcd into the Repo directory To follow along:
cd RPM_Packaging_Tutorial/- Generate the folder structure:
rpmdev-setuptreeThis will create the file tree needed to create an rpm package. The files will be generated in your user directory.Here is what ~/rpmbuild should look like:
rpmbuild/
├── BUILD
├── RPMS
├── SOURCES
├── SPECS
└── SRPMS
Let’s take a moment to consider each folder and its purpose:
- The BUILD directory is used during the build process to store temporary files.
- The RPMS directory is used to store the RPM package that can be installed after we are finished with the build process.
- The SOURCES directory, as the name suggests, holds the source code for our application, it can be in any programming language you desire, a convention is that the file is compressed in tar.gz or .tgz formats.
- The SPECS directory contains the .spec file for our package. This is the file rpmbuild utility looks at and then knows what steps need to be done during the build process.
- The SRPMS directory contains a tarball with the source code (a tar.gz file) and a set of instructions on how to build the binary, a .spec file.
Introducing the application
Our application will be a simple game written In c. The game’s purpose is to guess the Random number.
cgame.c
#include <stdio.h>
#include <stdlib.h>
#include <time.h>

int main() {
    int random_number, guess, number_of_guesses = 0;
    time_t t;

    // Initialization of random number generator
    srand((unsigned) time(&t));

    random_number = rand() % 100 + 1; // Random number between 1 and 100

    printf("Guess the number (between 1 and 100):\n");

    // Loop until the user guesses the number
    do {
        scanf("%d", &guess);
        number_of_guesses++;

        if(guess > random_number) {
            printf("Lower!\n");
        } else if(guess < random_number) {
            printf("Higher!\n");
        }
    } while(guess != random_number);

    printf("Congratulations! You've guessed it in %d tries!\n", number_of_guesses);

    return 0;
}
If you are eager to try it, here are the steps:
compile it:
gcc -o cgame cgame.cAnd then Run in with
./cgame If you’re familiar with C programs, you probably know it is useful to have a Makefile that contains the build process, so we can build the program using a single command named ‘make’.
Here is the Makefile for our cgame:
cgame:
        gcc -g -o cgame cgame.c

clean:
        rm cgame
install:
        mkdir -p $(DESTDIR)/usr/bin
        install -m 0755 cgame $(DESTDIR)/usr/bin/cgame
Let’s create an RPM from cgame.
To successfully build a package we need to put our source code into the SOURCES folder.
We will use a directory name that indicates the version of the project using semantic versioning. This is done in most projects.
Let’s decide we release today V 1.0.0, exciting, isn’t it?
2. Archive the folder containing the application and the MakeFile
Run the following commands when you are inside the repository folder:
mkdir cgame-1.0.0
mv cgame.c Makefile cgame-1.0.0/
As mentioned before, The folder should be archived and compressed. We will use the tar command to archive our new folder.
This should be the content of cgame-1.0.0
cgame-1.0.0/
├──  cgame.c
├── Makefile
Run the following command to archive the Source code along with the makefile:
tar -czvf cgame-1.0.0.tar.gz cgame-1.0.0- c – create archive
- z – Filter the archive through gzip compression
- v – verbose
- f – name of the archive to create
Now, lets move the archive into the SOURCES folder
mv cgame-1.0.0.tar.gz ~/rpmbuild/SOURCES/The heart of every RPM Package: The SPEC file
After we have our application code as an archive, what is left is to configure a SPEC file.
Remember we installed rpmdev-tools? It includes a package called rpmbuild. This utility’s purpose, as the name suggests, is to build our source code. Here is where the spec file comes into the picture.
A SPEC File is like a recipe that tells the rpmbuild utility how to build and set up our application. Since we are distributing a C program one of the steps will be to compile it using make.
Consider the following SPEC file:
Name:           cgame
Version:        1.0.0
Release:        0%{?dist}
Summary:        guess the number game

License:        GPLv3+
URL:            https://github.com/EliorEstrin/RPM_Packaging_Tutorial/tree/main
Source0:        %{name}-%{version}.tar.gz

BuildRequires:  gcc
BuildRequires:  make

%description
an interactive game that challenges users to guess a randomly generated number between 1 and 100.

%prep
%setup -q


%build
make %{?_smp_mflags}


%install
make install DESTDIR=%{buildroot}


%files
%{_bindir}/%{name}


%changelog
The spec file has two main parts:
- Preamble Part – which contains a series of metadata items that are used in the Body part. (Name, Version Release etc..)
- Body Part – The main part of the instructions, The body part consists of items called ‘Macros’, each macro begins with a % and it is a text substitution. For example, as we define the Name on the first line, we can reference it later using %{name}.
Let’s go over important components and macros of our Spec File:
- Header Information: Defines basic metadata about the package such as name, version, release number, summary, license, and the source file.
- Build Requirements: Lists the dependencies required to build the package.
- %prep: Contains commands for preparing the build, in our case, we use the command %setup -q that is used to unpack the archive that is inside the Source0 folder. -q stands for quiet to keep a cleaner output.
- %build: This is where we define how to actually build the software. Since our Software uses a Make file we can use the GNU make command provided by the rpmdev utilities.
- %install: used for copying the desired build artifact from ~/rpmbuild/BUILD to ~/rpmbuild/BUILDROOT. BUILDROOT is a temporary directory during the build process. Note that this step does not occur when the end-user installs the program.
- %files: The list of files that will be installed in the end user’s system.
- %changelog: if you are familiar with git, it is similar to the commit history/messages, it provides a way to record the changes between different versions or releases.
Run The following command to move the Spec file into the SPECS folder:
mv cgame.spec ~/rpmbuild/SPECS/3. Bumping the changeLog:
rpmdev-bumpspec --comment 'Initial package' ~/rpmbuild/SPECS/cgame.specThis command creates a new change log at the end of the spec file, with the current day’s date.
4. Testing our spec file with rpm lint
The rpmlint command finds errors in .spec files and is a great way to see if our spec file deviates from best practices.
rpmlint ~/rpmbuild/SPECS/cgame.spec The lint result should be:
home/elior/rpmbuild/SPECS/cgame.spec: W: invalid-url Source0: cgame-1.0.0.tar.gz
0 packages and 1 specfiles checked; 0 errors, 1 warnings.
We get one warning, but it is acceptable because the source archive is a local file and has no network URL.
3. Build the program
We can now build our source code by using the following command:
rpmbuild -bb ~/rpmbuild/SPECS/cgame.spec-b: build
-b: binary
If everything runs successfully an RPM file will be created in RPMS.
├── BUILD
├── BUILDROOT
├── RPMS
│ └── x86_64
│ ├── cgame-1.0.0-1.el7.x86_64.rpm
│ └── cgame-debuginfo-1.0.0-1.el7.x86_64.rpm
Installing the package:
sudo yum install -y ~/rpmbuild/RPMS/x86_64/cgame-1.0.0-1.el7.x86_64.rpmWe can now play the game by typing in the terminal:
cgameFurther exploration with RPM
Once the package is installed, We can view different metadata about the package with the following command:
rpm -qi cgame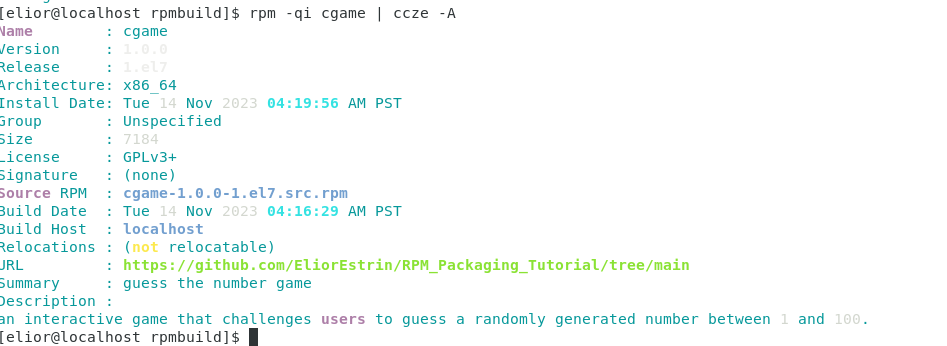
Conclusion
And there you have it! You have just discovered the process of creating an RPM package, a skill that could be a game-changer in your Linux journey. Imagine the possibilities – your software, streamlined and accessible, ready to be shared with the Linux world.
But don’t stop here. To keep your momentum and curiosity alive, here are some excellent resources that can guide you further:
Red Hat Lab on RPM Packages: Dive into interactive learning and get hands-on experience with RPM packages.
Exploring RPM Macros – Deepen your understating and discover the different available RPM Macros.
Happy Packaging 🙂